Hello there readers of Things We've Cooked. Sorry for the lack of posts lately.
Just that since we moved over to our new place, I haven't been as encouraged to cook/bake as much let alone take pictures due to the lack of space in the kitchen.
It's not that we don't cook any more... just that I don't have enough counter space and the lighting is not the best... so I haven't been able to do step by step pix as much as I'd like.
Anyways, please be patient and I will be back soon!
Pinky promise :)
Wednesday, April 18, 2012

Saturday, January 28, 2012
Tip: Storing meat
Okay! Now the pup and I cook almost every day, but with our working schedules, we can't afford to do what our mom's did - buy meat and veggies daily. So we stock up, especially on meat.
We've pretty much worked out the amount/weight of meat that we normally eat for one meal so what I've done is to re-pack all the meats into portions for each meal.
Earlier I used cling wrap to individually wrap up the pieces of meat but recently I've discovered snack sized zip lock bags!!! OMG so much fun. So much easier. So much cleaner!

This is my bacon. For me, the more fat and the chunkier it is, the more I love it.

The pup on the other hand is a lean meat lover. So he gets back bacon instead.
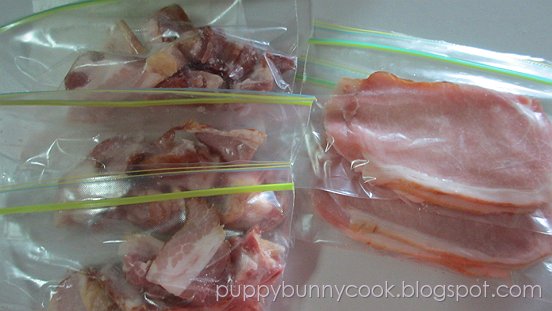
See? Nice and neat, no? And at least I won't have to worry about ruining the rest of the meats when I try to defrost it.

These are the ones I use. I actually bought them by mistake, I wanted a slightly larger one but hey, sometimes things just work out after all, no?

All my other meats in snack sized zip lock bags in the freezer :)
Until next time!
xxx
bunny
Sunday, October 23, 2011
The weekend snacks: Apple raisin bread pudding
Been having a craving to learn how to make a bread and butter pudding... (partly because the pup likes it) and it's something I've never tried before... so why not!
Most recipes I saw online were for a regular sized pudding but I didn't want to venture that far and thought I'd experiment in small doses first. So I kinda made up my own recipe based on what I read online...
Ingredients
- 250 ml of milk (I used a small tetra pak)
- 1 egg
- 1 drop of vanilla essence
- 1 tsp sugar
- slices of white sandwich bread (or you can use any good bread, really)
- 1 green apple, cubed
- raisins (as much as you like)


Add the milk, egg and vanilla. Mix well. No need to beat it until it's all bubbly and fluffy.

Add a little sugar and mix well. Make sure the sugar is dissolved.

Butter the bread and cut into strips and then into halves. Well I did this because my ramekins are rather small but you can do them in triangles or even just halves if you're making a regular sized one.

Put one layer of buttered bread and sprinkle the top with cubed apple and raisins.

Repeat until you reach the top. Then slowly pour in the egg/milk mixture till just about three-quarter full

Be warned. Pouring liquid into a small container can get quite messy!

Sprinkle a bit of sugar on top so you'll get a nice brown crispy top. Stick it in the oven for about 20 mins or so and it's ready!
Happy trying!
xxx
bunny
Saturday, July 23, 2011
The weekend snacks: Banana chocolate chip muffins
I've been having this on my mind for like the longest time. But I never really dared to bake. It always ends up wonky. Plus, most of the baking stuff needs a mixer and I don't own one :P
But since I successfully baked bread couple of months ago I thought I'd give this a shot.
This banana chocolate chip muffin recipe looked relatively easy.

Ingredients
- 2 1/2 cups (375g) self-raising flour
- 1/2 tsp ground cinnamon
- 3/4 cup (170g) sugar
- 1/2 cup (95g) milk chocolate chips
- 1 cup (250ml) milk
- 3/4 cup (185ml) vegetable oil
- 1 egg
- 2 small over ripe bananas
But of course I improvised a bit here :P
Instead of self-raising flour, I used all-purpose flour because that's the one I had in the pantry. Plus I used more bananas and choc chips than the recipe called for, not that anyone's complaining about the extra flavors :P

I read up about making these muffins from several recipes and every one of them asked for very ripe or over ripe bananas. Apparently these will give a better taste than a regular ripened banana.

First put all the dry ingredients in a bowl. I sifted the cinnamon powder, flour and sugar together and dunked the choc chips on top.

Then mixed it all properly.

Next - bananas. You'll get some soft and opaque-ish spots on overly ripened bananas. Just trim those bits off and you're good to go. I cut them into one-inch pieces and mashed them with a fork.

When you're done mashing, add in the milk, egg and oil. Stir well.

Pour the wet ingredients into the dry and stir to combine. Whatever you do, DO NOT BEAT the mixture as it will make the texture less fluffy. Just stir it in.

You'll end up with a gooey mixture. I felt it was a bit too fluid but then again I've never made muffins before so I really don't know any better....
Anyways, this is the time you can start to preheat the oven at 200C (392F).

Then I lightly oiled the base and sides of the muffin trays...

... and scooped the mixture in.

Then leave it in the oven for about 20 mins or until it turns nice and golden brown.

Yeah. They don't really look like muffins right? Note to self: Always follow the recipes diligently! I really should have used self-raising flour instead.

There you go. My banana chocolate chip muffins :P
Verdict: It doesn't taste too bad but the texture's all wrong.
Oh well, practise makes perfect, right? I've just gotta keep trying.
If any one's got any muffin baking tips or other recipes, please do share! I'd love to learn more!
xxx
~bunny
Sunday, June 26, 2011
Easy Desserts: Son of a Peach
What do you do when you've got some digestive biscuits and a tin of peaches at home? Get some vanilla ice cream and make the world's easiest dessert!
Ingredients
- 2-3 pieces of digestive biscuits
- 12-15 slices of tinned peaches
- 2-3 scoops of vanilla ice cream

Delicious on their own... fantastic together!

Take the digestive biscuits and put them in a zip loc bag. Burp the bag and zip loc it tight. You can either smash it a la Jamie Oliver (wrap them in a tea towel and smash them against the kitchen counter) or just use the back of a ramekin/small bowl to smush it.

This is what you should see in the end. Try to get it as fine as you can but hey, if you like chunky bits then stop halfway :)

Pour the powdered digestive biscuits into the ramekins. If you don't have these, little glasses would do too...

Add on a generous layer of vanilla ice cream on top. Don't fill it all the way to the top though - you need to leave space for the peaches!
Stick these back into the freezer so that the ice cream gets to firm up properly.
Take them out when you're just about to serve....

... and layer on the slices of tinned peaches... add on as much as you like!

There's only space for one layer for peaches here though :P

Tadaa!!! A super easy dessert :)
Happy "cooking"!
xxx
Bunny
Subscribe to:
Posts (Atom)