Thursday, April 21, 2011

The weekend meals: Cold Chicken Pasta

In my last post, I showed how to make a cold pasta salad with tuna... this time I decided to use chicken instead. It requires a bit more work - marinade, grilling, and chopping but I assure you, it's well worth it!


Ingredients are very similar to the previous recipe. Feel free to add or omit any veggies that you prefer.

  • 3 sticks of celery
  • half a red bell pepper
  • 1 green bell pepper
  • 1 carrot
  • 1 kyuri (Japanese cucumber)
  • 1 chicken breast
  • about 3 handfuls of pasta
  • olive oil
  • salt & pepper (to taste)
For the marinade
  • Soy sauce
  • Pepper

Slice all the veggies up and dunk them in a bowl of water and put it in the fridge. I usually slice them to about the same width and length. Oh and I put it in the fridge because it helps to keep the veggies fresh and crunchy while I do the rest of the stuff.


Slice the chicken breast into strips and pour some pepper in. Now here's a bit of the problem, I can't tell you exactly how much to put because I did it by some sort of instinct. So I'm going to say roughly about 4-5 shakes of pepper....


And about 4-5 glugs of soy sauce.


Mix it up. IF the marinade looks a little dry, add a bit more soy sauce. Let it sit for at least 10-15 minutes so that the chicken actually gets the chance to absorb the marinade properly.

If you've got the time to spare, let it sit in the fridge for an hour or so.


Heat up the griddle pan on medium heat with some olive oil. You can also use a regular frying pan but you won't get the nice char marks or the caramelized sauce. Well not as much as from a griddle pan.


Try to place the marinated chicken breast strips as neatly as you can across the griddle.

Note: use whatever utensil you're more familiar with. In my case, it's just the Asian-ness that makes chopsticks a much easier utensil than a pair of tongs or spatula.

Let it cook until you see the sides of them lose their opacity and turn into a more solid almost white color. Then you can start flipping them over to cook on the other side. Once that's done, take them off the griddle onto a plate and let them cool. I usually just shove them in the fridge.


While you're waiting for the chicken to be done, start cooking the pasta. I always add a dash of salt and a small glug of olive oil in. The salt gives it a bit of flavor and the oil makes sure that it doesn't stick. For some other recipes, I like putting a bay leaf in.

Once the pasta is done, drain properly and cool them by running them under some tap water. This will prevent it from cooking any further.

I also put this in the fridge to keep them cool. It is after all a cold chicken pasta....

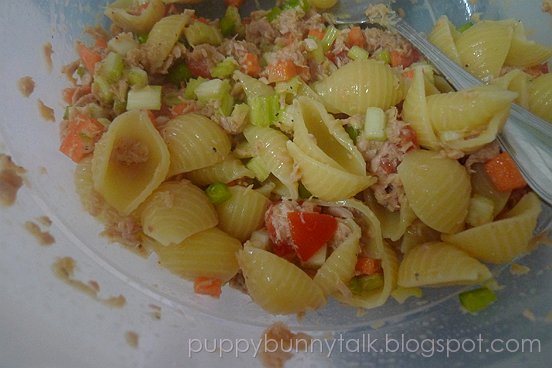
After an hour or so, take everything out (veggies, pasta and chicken) and give 'em all a nice dicing.... except for the pasta...


Place in a bigger bowl and combine slowly. If you are a tad rough or too fast, the pasta will break and you'll just end up with bits and pieces of them...


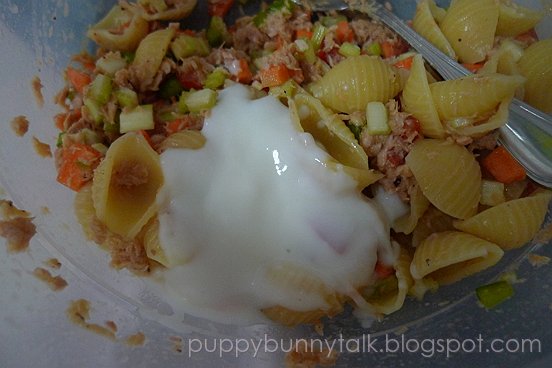
Add a little salt and pepper to taste while mixing to get the right taste. If it's not salty enough, don't worry, the chicken will release its flavors after a bit so go easy on the salt.


There you go!

Easy peasy innit?

Happy cooking!

xxx
Bunny

Sunday, April 17, 2011

The weekend meals: Cold Tuna Pasta

While spring-cleaning the kitchen pantry this weekend, I found a can of tuna and thought it would be quite a waste not to use it and also "Hmmm what can I make with this?" because Puppy doesn't like fish as much... as I do (duh).

Since we do have quite a bit of raw veggies stocked up, I was looking for a no-cook, no-brainer kind of food, I decided to make cold tuna pasta salad. This recipe is inspired from here, of course as usual, I modified it (to what I have in the kitchen and to my taste).

Since it's a cold (and can be warmed up) salad, not only is it a tasty snack, it's a great dish to make to bring to work as a healthy lunch too!

Ingredients are:-
  • 6 cherry tomatoes
  • 2-3 sticks of celery
  • 1 carrot
  • 1/4 green bell pepper
  • 1 can of tuna
  • Juice from half a lemon
  • About 3 hands full of pasta
  • Salt & Pepper to taste
  • 1/2 cup of plain yoghurt (the one I have here in the pic is 135g so it's about 60g or so?)

Dice the cherry tomatoes, celery, carrot and bell pepper into cute little squares. Pop in the canned tuna - make sure you drain it properly though because the oil can make the dish a bit fishy. If you don't mind it by all means pour the whole can in! :)

Mix it up well and make sure you mash the tuna chunks up.

Squeeze in the juice of half a lemon. This helps to make it less fishy and gives it a nice tangy fresh taste!

While you're at it, boil a pot of water for the pasta. Add a small dash of olive oil and about 2 pinches of salt to it and follow the directions to cook the pasta.

I like using freshly ground black pepper. It really tastes better. This one from McCormick is pretty good but isn't refillable... still looking out for a good pepper and salt mill... If you do know of any, do drop me a note :)

Add some salt in. Don't pour in a lot. Sprinkle a little in, stir it up and taste. You don't want to end up with a super salty dish! Oh and it's better to use fine salt for this. I usually use chunky sea salt bits but since this is almost a no cook dish, you'll end up with salty chunks hidden somewhere in your salad and trust me... it's NOT a good surprise.


By the time you're done taste testing, your pasta should be pretty much done. Mine takes 10 mins to cook. When it's done, drain it and pour in into the tuna mix.

For most dishes like these, I like to use pastas like shells or spirals because then the yummy mix gets trapped in the pasta :P

Mix it well. I like to mix it while it's fresh off the stove because then the heat from the pasta kinda cooks the tuna mix a bit.

I used the spoon from the yoghurt cup and put in about 5 spoonfuls. That's roughly half a cup of yoghurt there. Most other recipes I saw online called for mayo instead but since I didn't have any mayo and thought that I should eat more healthy, I opted for yoghurt instead.

Mix well. You can add some more salt and pepper if you need.

p/s: Yeah I know the yoghurt looks kinda disgusting here :P

Pack it up into a container, seal tight and chuck in the fridge to cool!

It's as easy as that!

Happy cooking :)

xxx
Bunny

Saturday, April 9, 2011

Lemon Mint Granita Part II

The granita after being in the freezer for two hours or so. I had scraped it up a bit before dinner and came back to this :)

This is what it looks like when you scrape it after it's nice and frozen. It looks nice and flakey :)

Scoop it in a cup and decorate with some mint leaves.

p/s: after the first cup, Puppy realized that this was very similar to the mojito 'cept that it's lemon instead of lime and added some rum to it...

Well hello happy hour!!! :)

Lemon Mint Granita

I've got a pot of mint growing in my garden and oddly, I've always loved the scent but never really did like mint in my food.

That's it sitting there with my rosemary :)

But then again it was such a waste having it there and not using it... so I thought "Let's make some zesty granita!!!"

I went online and this recipe by smitten kitchen really caught my eye. It looked SO adorable... those little lemon cups. I had to give it a try!

The original recipe called for 4 lemons, 4 cups water, 3 tbsps sugar and a handful of fresh mint leaves.

I gave it a bit of a twist.

These are the ingredients - lemons, mint leaves, sugar and water. How much of each bit you use really depends on how much granita you're making. I decided to go with the recipe and use four lemons.


First I zested two lemons. I just thought this would give it an extra kick!

Then I cubed four lemons up. I removed the skin as much as possible and also roughly deseeded them.


Then I chucked in what seemed to be a handful of mint leaves. I cut seven sprigs of mint from my pot - so you can roughly do a bit of estimation.


Pulse it up into a puree in a blender or a food processor and then let it sit for a bit. This will allow the mint to fully infuse its flavors into the lemon.


This is the fun part. Sieving the pureed lemon & mint. I actually did two rounds of this - first with the sieve, then I scooped it all into a cup and used my hands to squeeze some more out.


Add in the water. I measured three cups here in the bowl but only used about two cups. Then I added sugar bit by bit until I got the taste that I wanted. It still has the nice zesty lemon-mint tang and the sugar just helped to keep it from going overboard.

I love these little mint specks :)

Pour it into a shallow pan


And chuck it into the freezer. You'll need to remember to scrape it a bit after an hour or so. This really depends on your freezer too... some people set theirs on high so it will freeze faster. Mine is set on medium and I checked it after half an hour, it was still very watery.

I'll post an update when it's ready :)